Welcome to the most detailed guide on how to dry wood fast for woodworking! In this article, I have covered all the most effective and speedy methods to dry wood in the simplest words possible to help you prepare lumber for your next great woodworking project.
After reading, you will be surprised by how exciting the wood drying process actually is. I have meticulously covered all the best and quickest wood drying methods so that you don’t face any problems during the process.
Read attentively not to miss anything, and don’t skip the FAQ section to get more details.
Contents
Guide on How to Dry Lumber Fast
Let’s get straight to the point and learn everything about the best wood drying methods out there. You might be happy to hear that drying wood for woodworking can be done in different ways, and you can select a method that looks the best for your purposes.
Below is a detailed description of 3 excellent methods that will help you dry lumber really quick!
Air drying
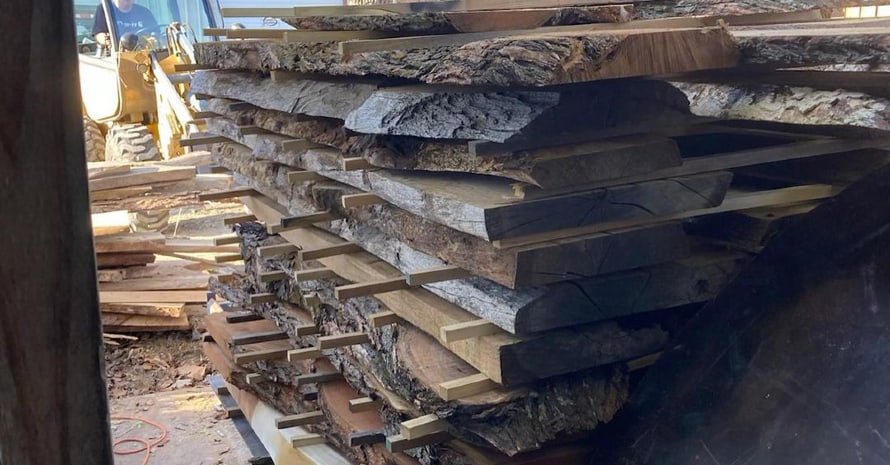
Air drying is one of the simplest and cost-effective ways to get perfectly dry project-ready boards. The most common method to air-dry lumber is to lay down the boards one upon another and create an air layer by putting thin planks perpendicularly in between the layers.
It requires some preparation, though. First of all, you need to find the evenest spot in the yard. The best place is a paved area as it’s not prone to subsidence. Once the best spot is found, you need to create a good three-tier base. For this, you need to:
- put three or more (depending on the length of your boards) cross pieces of heavy timber or cinder blocks down on the ground;
- put two longer heavy timber pieces along the first tier;
- put five or more ¾” thick planks across the second tier to ensure that the weight of the wood is spread evenly over the construction yet the wood receives enough airflow from below.
This construction will ensure that the wood you dry is high enough and doesn’t absorb vapor that flows from the ground. If you lay it down closer to the ground, mold and mildew can start growing.
When the base is ready, you have to start laying down the lumber. It’s necessary to leave a couple of inches between each board in a layer to promote an even drying process. Besides, it’s necessary to lay down narrow cross planks in between each layer.
If you have a lot of lumber to dry and lack space, you need to create extra spacing between each 10th layer using wider cross pieces of timber. This way, you will create extra tiers and promote better airflow.
Next, you need to consider that the edges of the boards on the long ends will physically dry faster. You don’t want this to happen, so you need to cover these edges with a transparent sealer to ensure that the whole thing dries more evenly and doesn’t warp.
If you dry wide boards, you should also know that their ends are prone to splitting. To combat this problem, you can drive heavy staples into the ends before sealing them. This will hold the ends firmly and protect them from splitting due to faster drying.
To finish, you need to cover the top of the construction with a larger piece of metal or slate to protect it from rain. Secure this “roof” with heavy cinder blocks to protect it from the wind.
Now, let’s get to the pros and cons of air drying. It’s a cheap method, and it’s perfect for drying green freshly sawn boards to around 12%-20% of moisture content. However, you should know that it takes from 2 to 12 months for standard 4/4 wood pieces to dry, regarding the climate in your region.
You should also be ready to lose around 5%-10% of boards due to defects in the process. Once the wood dries to 12%-20%, you can use it for outdoor projects right away.
However, if you need it for indoor projects, restacking the wood indoors is required to lower the figure to 5%-8%. You can check out recommended figures in this moisture content guide.
- Easy
- Cheap
- Effective enough for wood used for outdoor projects.
- Takes up to 2-12 months;
- Requires restacking indoors for indoor projects.
- Loss of up to 10% of the material.
Shed Drying
Shed drying is a variation of air drying that uses a custom-constructed shed to achieve better control over the process. A shed may include special shelves for creating more spacing between the layers of wood and make it easier to manage during the drying process.
Besides, you can build a shed with walls to control the drying speed better. Another benefit of a shed with walls is that the wood is protected from direct sunlight, which significantly reduces warping and cracking probability.

Shed drying usually employs large fans to control air circulation in the building. Here are the major principles of using the fans properly:
- If you dry wood types that are prone to cracking if dried quickly, such as oak, you need to run the fans when the air humidity is high and the temperature is low. Turn the fans off when the air humidity gets low and the air temperature gets high. This way, you will protect moist lumber from cracking at the beginning of the drying process.
- Once the wood reaches 20%-22% moisture content, you can turn on the fans once again to speed up drying without the risk of cracking. If the air humidity is high, don’t use the fans to avoid bringing more moisture.
While this method adds more control over the process, the final moisture content is still dependent on temperature and humidity in the area, just like with air drying.
- Protects the wood from the sun;
- Allows you to manage the airflow in the shed.
- Protects fresh wood from cracking due to airflow control.
- Walls can slow down the drying process, yet reduce the loss of material.
- More expensive than air drying.
Kiln drying
Now, let’s get to the quickest method on the wood drying time chart! A wood kiln (or an oven) is a structure that provides you with full control over the temperature, humidity, airflow, and vapor inside the wood drying chamber. All these opportunities combined let you dry lumber a lot faster than air drying and shed drying methods allow.
Kilns use rapid hot air circulation and improved ventilation to remove moisture from the lumber in just one month, a few days, or even less than one day, depending on the type and thickness of the pieces. In order to optimize the drying process, one kiln is usually loaded with the wood of the same type and thickness.
Now, you probably want to know how to build that kiln at home, right? Here’s a quick instruction:
- Lay down a clean plastic roll and place the stock of wood on it.
- Use 2×4 planks to build a frame around the wood. Consider enough space for a dehumidifier on one end and a fan on another.
- Seal the frame with thick plastic film and install two tubes so that the fan could take the air on one end and blow the dehumidified air from another.
- Set the fan and dehumidifier on maximum and wait for the wood to dry. Control the drying rate with a moisture content measuring device and make records regularly to know the approximate time needed for the process to finish.
- The fastest way to reduce moisture content in wood;
- A kiln is easier to build than a shed.
- Your utility bill will be notably higher.
FAQ About Wood Drying Methods
Now that you know everything about the fastest methods to dry wood, it’s time to take a look at some more quick facts to reinforce your knowledge. Here you go!

What is the fastest way to dry wood for woodworking?
The best way to dry wood quickly is kiln drying. It allows drying freshly sawn 1-inch lumber down to 18% moisture content in just 10 hours. However, wood types such as red oak of the same thickness take up to 30 days to dry down to 8%. That’s still the fastest way available.
How do you dry fresh wood without cracking it?
I recommend sealing the ends of the boards to make them dry more evenly and drive large staples into the ends to hold them firmly and prevent cracking.
How do you know if the wood is dry enough for woodworking?
Clarifying the “how dry does wood need to be for woodworking?” question, you should use a digital moisture content meter for wood. As for the recommended moisture content levels, you need around 12% for outdoor projects and 5-8% for indoor projects.
How fast can you dry lumber?
Figuring out how long does wood take to dry, you need to consider airflow, temperature, and relative humidity. In proper conditions, most wood types dry in 6-9 months. If the wood is cut into large pieces, it can take up to a year or so to dry.
Besides, you should read about the drying rate of your particular type of wood as some species, like oak, dry longer than others and can have a higher acceptable moisture percentage for woodworking.
Also read:
- Best Fence Stains and Sealers
- How to Rip Narrow Boards With a Circular Saw
- Reciprocating Saw vs Jigsaw
- How to Cut Trim with a Miter Saw
- Best Deck Sealers and Stains for Pressure Treated Wood
Dry It!
Are you ready to dry some lumber? I know that you are! Use this guide as an instruction, and you will tackle this task for sure. Now you can choose the method that matches your type of wood and purposes the best and prepare for your next project. In the end, you will receive perfectly dried lumber ready for woodworking and finishing.
Stay tuned for more useful woodworking guides and tool reviews and don’t be shy to ask me any questions on the topic in the comments. I will be there to reply as soon as possible. If you know any other cool methods, you’re welcome to share them below as well.


“A good tool stays with you for many years and choosing carefully ensures the job is done right, your work is neat, and the tool is always a pleasure to use”